|

This
tutorial was created by
Daphne using PSP X9 -
March 2017
it
is my own creation and
should it resemble any
other creation it would
be purely coincidental.
Do
not use or place it on
any website without my
written permission.
Copyright
© 2017 ~Daphne ~ All
rights reserved.
*****************************
You
will need the following
to complete this
tutorial.
Materials
https://www.mediafire.com/?007vpcvs8hzyqx6
LADIES
PROFILE-MISTEDBYGINA
PSPIMAGE
CAMELIA2
PSPIMAGE
MISTED
CAMELIA PSPIMAGE
JAZMIN
BRUSH -MARYTUBE..PNG
Save
to a folder on your computer
******
LF
MASK-2 JPG
Save
to your mask folder
******
PLUGINS
ALIEN
SKIN EYE CANDY 5 IMPACT -
PERSPECTIVE SHADOW
*******
STEP 1
Open
a new image 800 X 600
Transparent
background
PSPX-X9
Colour Depth= 8 bits/channel
SELECTIONS
>>>>SELECT ALL
Open
up the CAMELIA2 PSPIMAGE in your PSP workspace
Right
click on the Title bar and select COPY from the
options
Right
click on the Title Bar of your working image
and
select PASTE INTO SELECTION from the options
SELECTIONS
>>>SELECT NONE
********
STEP
2
Effects
>>> Image effects
>>> seamless tile at
the default settings
click
ok
Adjust
blur >>> gaussian
blur 25.00
click
ok
Effects
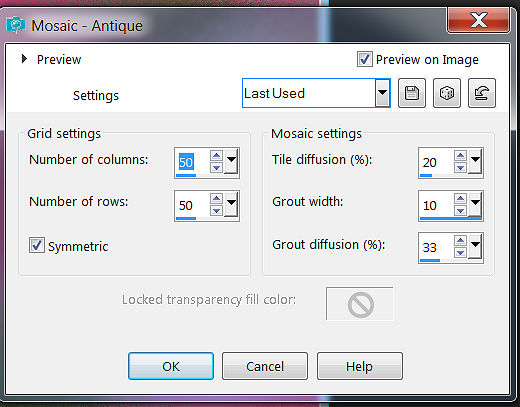
>>> texture effects
>>> mosaic antique
50
50 20 10 33
symmetric checked
click
ok
STEP
3
Selections
>>> Select all
>>> selections modify contract by
80
Layers
>>> new raster layer
Flood
fill with pink da508e
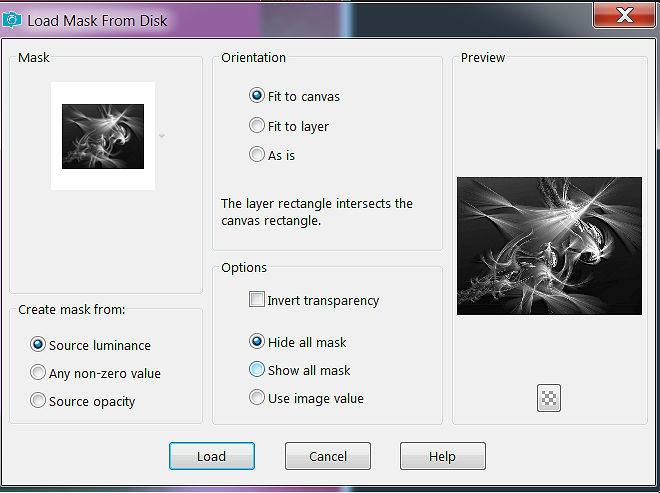
Layers
load save mask >>>load
save mask from disk >>>
LF Mask 2
Effects
>>> edge effects
>>> enhance
Layers
merge >>> merge the
group
STEP
4
Layers
>>>new raster layer
Selections
>>>Modify >>> contract by
3
Flood
fill with dark pink d51f79
Selections
>>> Modify >>> contract by
3
Flood
fill with the light pink
c24c7f
Delete
( hit your delete key )
Selections
>>> Modify >>> contract by
3
Flood
fill with the dark pink
Selections
>>>modify >>> contract by
3
Flood
fill with light pink c24c7f
Delete
( hit your delete key )
selections
none.
STEP
5
Selections
>>>Select all >>
selections float De float
Right
click in your layer palette and
promote selection to layer
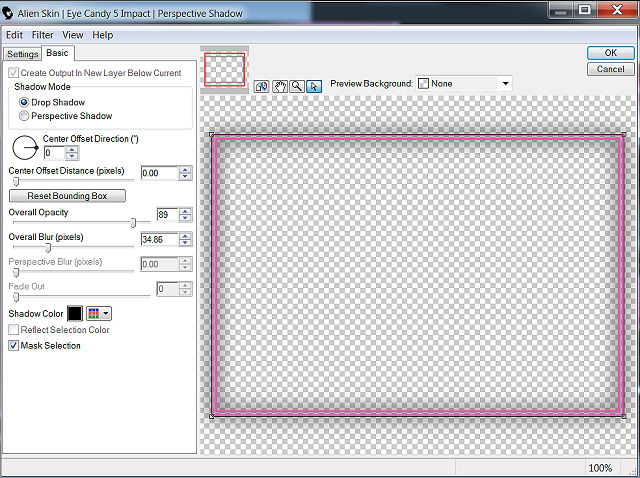
Alien
skin Eye Candy Impact 5
>>> Perspective shadow
click
apply
Layers
>>>new raster layer
Selections
>>> Select all
>>> Selections modify
contract 85
STEP
6
Effects
>>> plugins
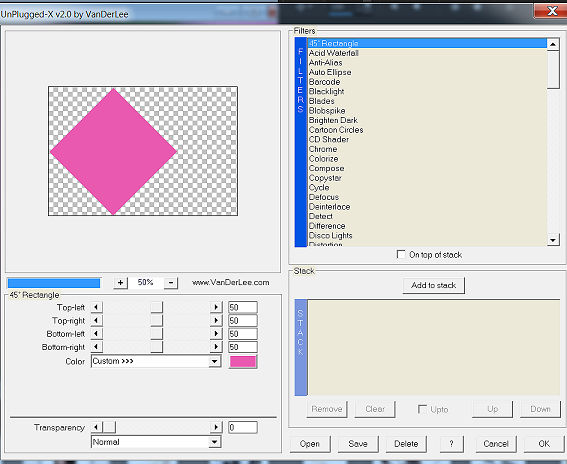
>>> Vanderlee Filter
>>> Unplugged X
45
Degree angle and changing the
colour to c34b80
click
ok
Selections
none.
Using
your magic wand
tolerance
and progresivity at 0
select
the Diamond
Layers
>>> new raster layer
Open
the Misted Camelia psp image in
your PSP workspace
right
click on the title bar and
select COPY from the options
Right
click on the title bar of your
working image
and
select PASTE INTO SELECTION from
the options
Selections
>>> select none
Layers
>>> merge >>> merge down
Effects
>>> 3d effects
>>> Drop shadow
Vertical
& Horizontal offsets =0
Colour
= black
Opacity
= 60
Blur
= 20.00
click
ok
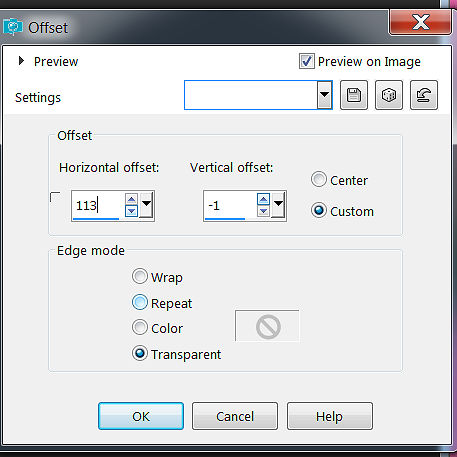
Effects
>>> image effects
>>> Offset
113
-1
click
ok
Layers
>>>Merge >>>Merge Visable
STEP
7
Layers
>>> new raster layer
Open
up your Jazmin
paint brush
in your PSP workspace and go
to
File
export custom brush and
rename the brush and it will be
in
your
brush folder.
Using
your paint brush
tool "Jazmine"
with colour
fdc7fd

add
it to the top left
Layers
>>> new raster layer
add
the paint brush again to the top
right
Go
to image >>> Mirror or
Mirror Horizontal and click
ok
Then
with your move tool, place the
brush back in the
upper
right corner.
STEP
8
Open
the Ladies profile MistedByGina
psp image in your PSP workspace
right
click on the title bar and
select COPY from the options
Right
click on the title bar of your
working image
and
select PASTE AS NEW LAYER from
the options
Selections
select none
image
>>> resize >>>
75%
Ensure
"Resize
all layers" unchecked
resample
using Weighted average
adjust
sharpness sharpen
click
ok
Effects
>>>Image effects
>>>Ofsett
254
-54
click
ok

STEP
9
Using
your freehand selection tool
...point to point
Select
the ladies dress
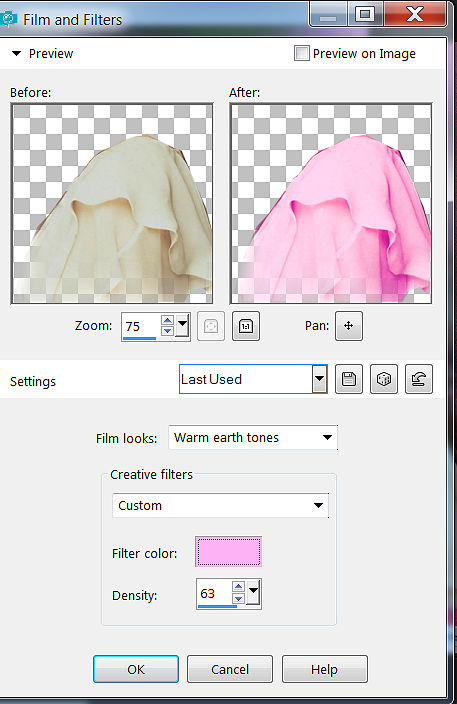
Effects
Photo effects >>> Film
and Filter
Change
the colour to fdb3fe
warm
earth tones and density 63
click
ok
Selections
none
STEP
10
Image
add borders 3
symmetric in dark pink
d51f79
click
ok
Layers
>>>duplicate
image
>>> resize >>>
80%
Ensure
"Resize all layers" unchecked
resample
using Weighted average
adjust
sharpness sharpen
click
ok
Select
the outer border with the magic wand
STEP
11
With
your Camelia
pspimage open in your
PSP workspace,
effects
>>> image effects
>>> seamless tile at
the default
go
to your materials palette and
put this in your patterns
section
0
100
click
ok
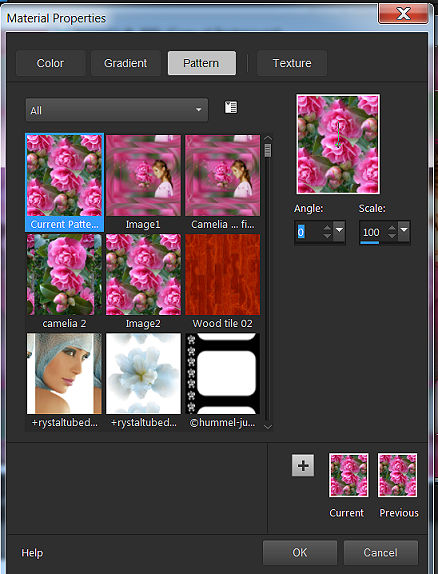
flood
fill with the pattern tile of
the Camelia
pspimage
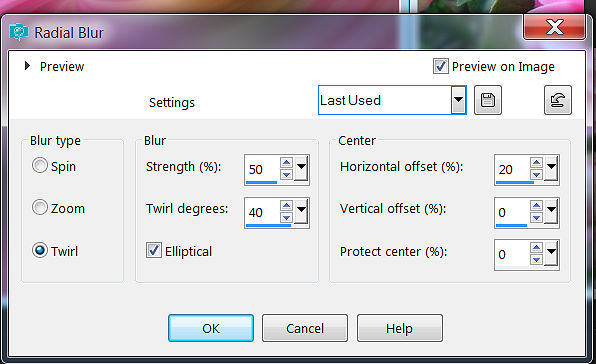
Adjust
blur >>> radial blur
click
ok
Selections
>>> invert
Effects
>>> 3d effects
>>> Drop shadow
Vertical
& Horizontal offsets =0
Colour
= black
Opacity
= 60
Blur
= 20.00
click
ok
Selections
>>> invert
image
add borders 3 pink
d51f79
click
ok
Selections
none.
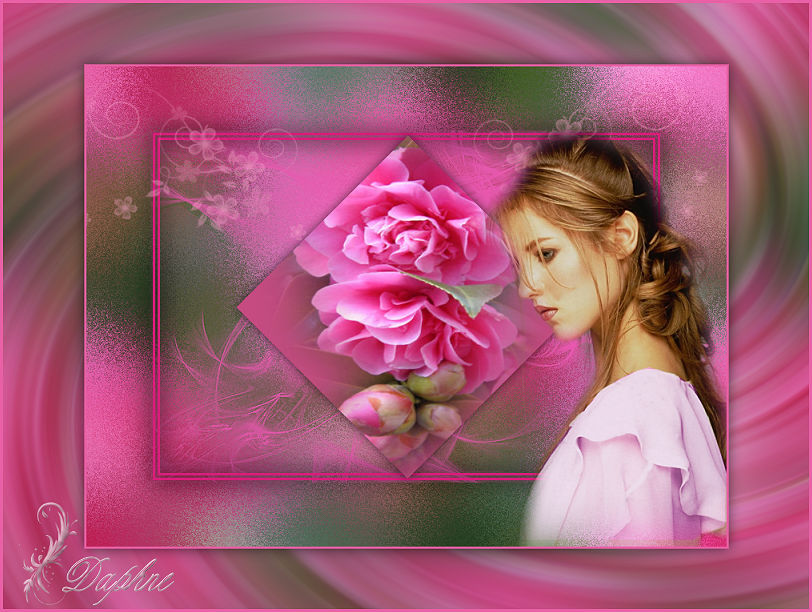
Save
as a JPG file and your finished
Copyright
©2017 ~ Daphne ~ All rights
reserved.
|