|
|
|
|

|
|
|
|
|
|

|
|
|
|
|
|
|
|
|
|
|
|
|
|
|
|
|
|
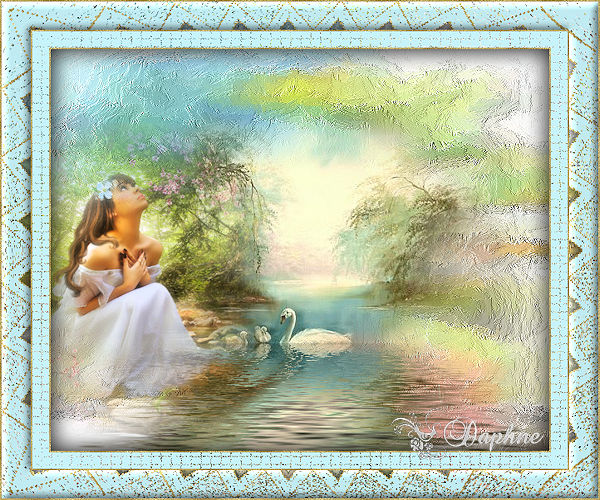
This
tutorial was created by
Daphne using PSP X9-
February 2017 |
|
|
Copyright
©2017~Daphne ~All
rights reserved |
|
|
|
|
|
********************************** |
|
|
|
|
|
You
will need the following
to complete this
tutorial |
|
|
********** |
|
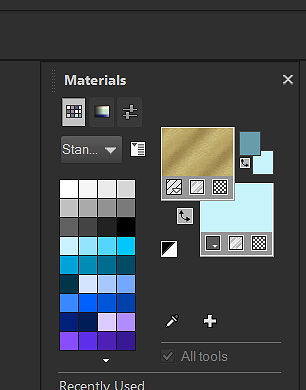
|
Materials |
|
|
|
|
|
BGD2_lesson2.JPG |
|
|
dd
33.psp image |
|
|
aaabibichekatten004.psp
image |
|
|
Save
to a folder on your
computer |
|
|
|
|
|
Goldfil
pattern |
|
|
Save
to your PSP patterns
folder |
|
|
|
|
|
Plugins |
|
|
CPK
DESIGNS |
|
|
|
|
|
Flaming
Pear Flood |
|
|
Extract
to your plugins folder |
|
|
|
|
|
|
|
|
In
your MATERIALS PALETTE
load the goldfil pattern
in the foreground using
these settings |
|
|
|
|
|
Angle
0 Scale 100 |
|
|
Open
a new image 600 x 500 |
|
|
Transparent
background
PSPX-
X9 Colour Depth
= 8 bits/channel |
|
|
|
|
|
SELECTIONS>>>>SELECT
ALL |
|
|
Go
to your DGD2lesson2.JPG
and click EDIT
>>> COPY |
|
|
|
|
|
Go
to your New Image
and click PASTE
INTO
SELECTION>>>SELECT
NONE |
|
|
|
|
|
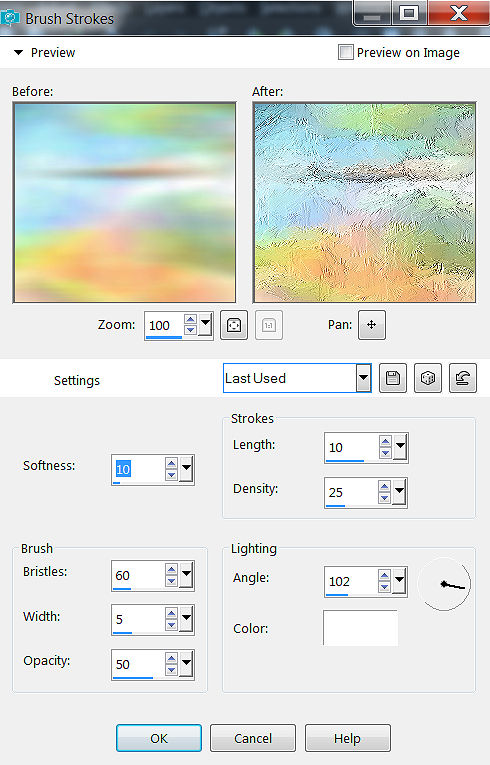
EFFECTS
>>>ART MEDIA
EFFECTS >>>
ARTISTIC EFFECTS
>>BRUSH STROKE |
|
|
|
|
|
|
|
|
|
|
|
Open
the dd.33 psp
image in your PSP
workspace |
|
|
|
|
|
Right
click the Title bar and
select COPY from the
options |
|
|
|
|
|
Right
click on the Title Bar
of your working image
and select PASTE AS NEW
LAYER from the options |
|
|
|
|
|
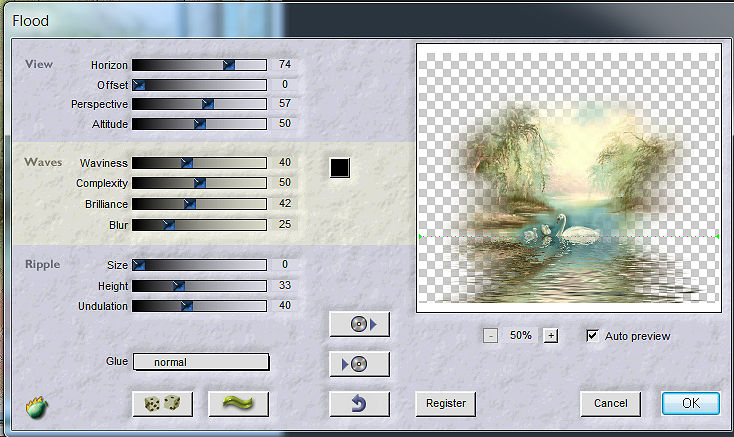
EFFECTS>>>PLUGINS>>>FLAMING
PEAR FLOOD |
|
|
|
|
|
 |
|
|
|
|
|
Open
the
aaabibichekatten004.psp
image in your PSP
workspace |
|
|
Right
click on the title bar
and select copy from the
options |
|
|
Right
click on the Title Bar
of your working image
and select PASTE AS NEW
LAYER from the options |
|
|
|
|
|
IMAGE
>>> RESIZE =
45% |
|
|
Ensure
"Resize all layers
" is
UNCHECKED |
|
|
Resample
using WEIGHTED AVERAGE |
|
|
|
|
|
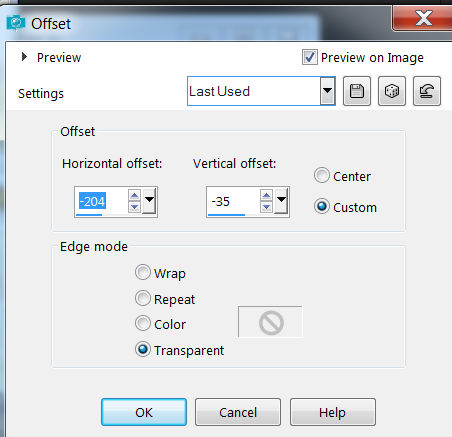
EFFECTS>>>IMAGE
EFFECTS >>>
OFFSET |
|
|
|
|
|
|
|
|
|
|
|
Use
your eraser tool to
clear away the shadow
showing from the tube |
|
|
I only used it twice
with these settings |
|
|
|
|
|
|
|
|
|
|
|
|
|
|
|
|
|
IMAGE
ADD BORDERS >>
SIZE 2 |
|
|
|
|
|
With
your MAGIC WAND |
|
|
Mode
= Replace |
|
|
Match
Mode= RGB value |
|
|
Tolerance
=0 |
|
|
Feather
= 0 |
|
|
Antialias
=UNchecked |
|
|
Sample
Merged = UNCHECKED |
|
|
PSP9-X2
CHECK CONTIGUOUS |
|
|
PSPX-X2
There is no "Sample
merged" |
|
|
PSPX-X2Use
all layers =UNCHECKED |
|
|
|
|
|
SELECT
the border and flood
fill with the Goldfil
pattern |
|
|
Keep
selected
>>>SELECTIONS
>>> INVERT |
|
|
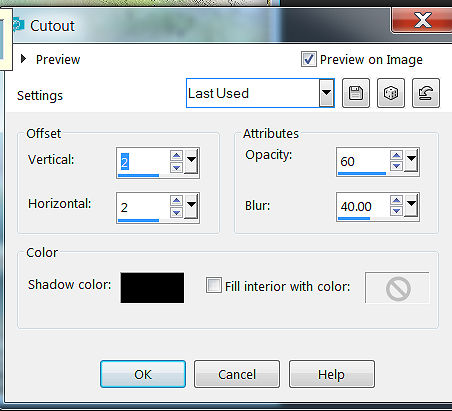
EFFECTS
>>> 3D
EFFECTS>>>
CUTOUT with the
following settings |
|
|
|
|
|
|
|
|
Still
selected re apply the
cut out only this time
with VERTICAL AND
HORIZONTAL AT MINUS 2 |
|
|
SELECT
NONE |
|
|
|
|
|
SELECT
YOUR EYE DROPPER TOOL
and pick a colour from
your image and make this
your background coloour
..... mine is C7f3fa |
|
|
|
|
|
IMAGE
ADD BORDERS
>>> SIZE
20 with the colour
you picked. |
|
|
|
|
|
WITH
YOUR MAGIC WAND
>>> SELECT THE
BORDER |
|
|
|
|
|
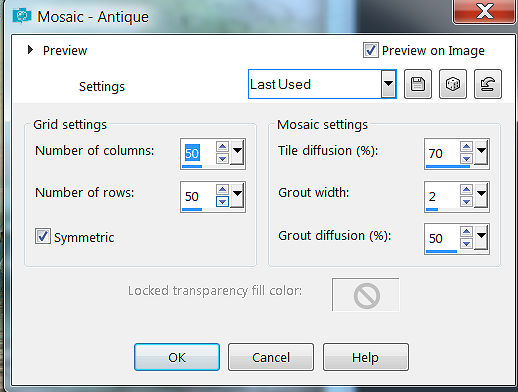
EFFECTS>>>
TEXTURE EFFECTS
>>> MOSAIC
ANTIQUE |
|
|
SELECT
NONE |
|
|
|
|
|
|
|
|
IMAGE
ADD BORDERS SIZE 2 |
|
|
|
|
|
WITH
YOUR MAGIC WAND SELECT
THE BORDER AND
FLOOD FILL WITH THE GOLD
PATTERN
>>>> KEEP
SELECTED |
|
|
EFFECTS
>>>3D EFFECTS
>>> CUT OUT
with the following
settings |
|
|
|
|
|
|
|
|
|
|
|
Still
selected re apply the
cut out only this time
with VERTICAL AND
HORIZONTAL AT MINUS 2 |
|
|
SELECT
NONE |
|
|
|
|
|
IMAGE
ADD BORDERS SIZE
35 COLOUR
C7F3FA OR YOUR
PREFERRED COLOUR |
|
|
|
|
|
With
your MAGIC WAND |
|
|
Mode
= Replace |
|
|
Match
Mode= RGB value |
|
|
Tolerance
=0 |
|
|
Feather
= 0 |
|
|
Antialias
=UNchecked |
|
|
Sample
Merged = UNCHECKED |
|
|
PSP9-X2
CHECK CONTIGUOUS |
|
|
PSPX-X2
There is no "Sample
merged" |
|
|
PSPX-X2Use
all layers =UNCHECKED |
|
|
|
|
|
SELECT
THE BORDER |
|
|
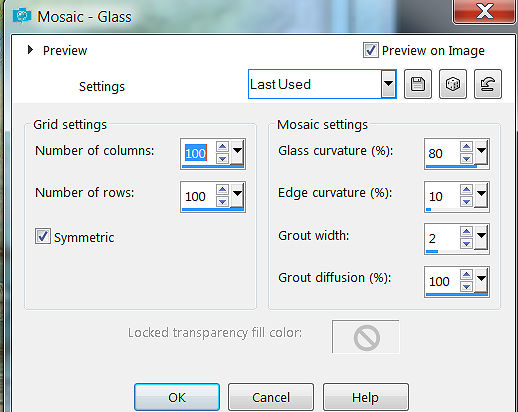
EFFECTS
>>> TEXTURE
EFFECTS>>>
MOSAIC GLASS with
these settings |
|
|
|
|
|
|
|
|
KEEP
SELECTED |
|
|
EFFECTS>>>
CPK DESIGNS >>>
STARS with the following
settings |
|
|
RAY
LENGTH
>>> 215 |
|
|
SPIKES
>>> 35 |
|
|
|
|
|
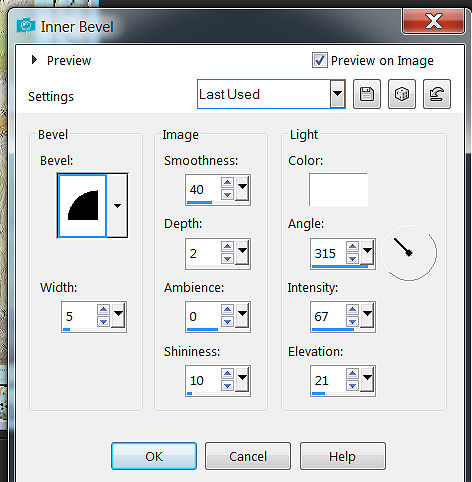
KEEP
SELECTED
>>> INNER
BEVEL with these
settings |
|
|
|
|
|
|
|
|
|
|
|
IMAGE
ADD BORDERS SIZE 2 |
|
|
WITH
YOUR MAGIC WAND SELECT
THE BORDER AND
FLOOD FILL WITH THE GOLD
PATTERN
>>>> SELECTIONS
SELECT NONE |
|
|
|
|
|
IMAGE>>>
RESIZE >>> BY
PIZELS
>>> WIDTH
600 >>> HEIGHT
500 |
|
|
LOCK
ASPECT RATIO UNCHECKED |
|
|
|
|
|
|
|
|
ADD
YOUR WATERMARK AND
LAYERS
>>>MERGE>>>ALL
FLATTEN |
|
|
SAVE
AS A JPG |
|
|
|
|
|
|
|
|
|
|